
If you’ve ever fallen hard for a designer piece but not-so-hard for the price tag, you are absolutely in the right place. Today’s post is all about taking a budget-friendly faux leather accent chair (or in my case… two very well-loved ones) and transforming them into something that looks straight out of a West Elm catalog. I’ll walk you through the entire process—from the surprising Facebook Marketplace find to the step-by-step method I used to paint and restore faux leather using the right products. Whether you’re here for a “look for less” win, a DIY confidence boost, or just a good makeover story, this one checks all the boxes.
How To Paint A Faux Leather Chair
If you’ve been here for a minute, you know I love a good project, but this time I was ready to launch a new little series called Find, Fix & Flip here on the blog. And naturally, it all began during one of my routine scrolls (as per usual) through Facebook Marketplace. You know the drill—you go in looking for absolutely nothing and suddenly find yourself emotionally attached to a vintage dresser in a zip code you’ve never heard of.
Well, this time, I stopped scrolling so hard I practically sprained a thumb.
There it was: a chair I recognized immediately.
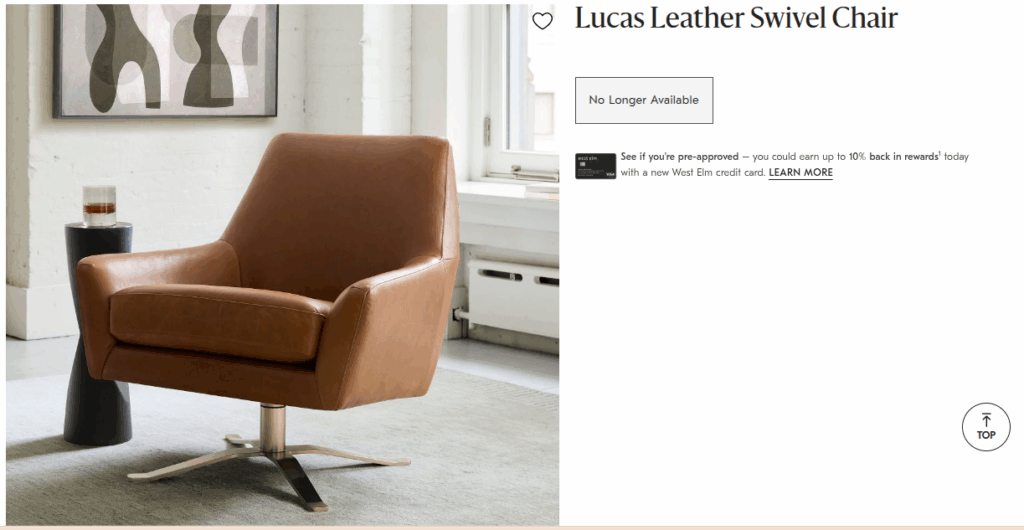
Now, you should know…I’ve been dreaming—borderline drooling—over the West Elm Lucas swivel chair (retired) for what feels like forever. In typical West Elm fashion, it’s styled to perfection: clean lines, that iconic mid-century modern silhouette, and yes… it swivels. I studied it. I fell for it. But at nearly $3,000, even a pre-owned version was out of my budget. (Why is heartbreak so expensive?)
So imagine the dramatics when I saw someone selling not one, but two of these chairs… for $25. Total. For both. I’ll pause so you can gasp with me.

Sure, they were in rough shape, but you already know where this is going—I had to have them. I did a little recon to confirm these were, in fact, the chairs of my dreams. Shape? Check. Base? Check. My delusion of having finally made it in life? Also check. I figured maybe the seller didn’t know what treasure they had—hey, it happens.
Keep Designing –
Naturally, I messaged immediately. A few exchanges later and I was all set to go pick up my chairs. My master plan: fix them up, keep one, and flip the other. If I could get even half the cost of a new Lucas chair, I could finally fund that sofa I’ve been side-eyeing for months. Win-win, right?
The night before pickup day, I dove into research mode and stumbled on this video explaining how to paint leather using Angelus leather paint. Here’s the video if you’re curious:
Her results? Incredible. My confidence? Sky-high. I went to bed practically glowing with DIY optimism.
And then… the plot twist.

When I arrived to pick up the chairs, the very nice gentleman selling them casually mentioned that he bought them from Target for about $200 each. Target. Not West Elm. Target. I had fully convinced myself I was rescuing two luxury icons when in reality, I was about to load up their more affordable distant cousins.
So the chairs? Not leather. Faux leather. And definitely not flip-for-$1,500-each material.
But listen—were they still worth $25? Absolutely. I could absolutely use one, and worst case scenario, I’d keep the better one and donate the other. So I paid the man, loaded them up, and headed home with a slightly bruised ego but renewed determination.
Now I just had one more concern: would the leather paint I planned to use actually work on faux leather? Good old Google said yes. And that was all I needed to hear. The Find, Fix & Flip project officially resumed—just on a smaller scale.
How to Paint a Faux Leather Chair (Step-by-Step Tutorial)

Using the same process from the video + Angelus leather paint
Materials
- Painting & Finishing
- Angelus Acrylic Leather Paint
- (My colors: Olive and Dark Gray)
- Angelus Acrylic Finisher
- (Matte or Satin — she used Satin in the video)
- Surface Prep
- Rubbing alcohol (70–90%)
- (For cleaning and deglazing the faux leather)
- Lint-free cloths or rags
- Light sanding block or fine-grit sandpaper
- (To smooth peeling or rough areas)
- Optional Supplies
- Painter’s tape
- (To mask off the metal swivel base)
- Hair dryer
- (For speeding up drying time between coats)
- Towels or drop cloth
- (To protect your workspace)
Tools
- Tools for Applying Paint
- Assorted paint brushes
- (Foam brushes + small detail brushes for seams and corners)
- Small mixing container
- (For blending paint or mixing custom colors if desired)
- Disposable gloves
- (Keeps hands clean, especially with alcohol and paint)
Instructions
Step 1: Deep Clean + Deglaze the Faux Leather
First things first: faux leather must be cleaned well for the paint to adhere properly.
- Pour rubbing alcohol onto a cloth.
- Wipe down every inch of the chair—arms, base of cushions, sides, front, seams.
- Keep wiping until the surface feels slightly matte and no longer slick.
This removes:
- dirt
- oils
- old finishes
- life’s mysteries
Let the chair dry for a few minutes.
Step 2: Gently Sand the Damaged Areas
Because the faux leather on my chairs was peeling and textured in spots (you saw the photos!), sanding was non-negotiable.
Here’s what I did:
- Use a light sanding block—nothing too rough.
- Lightly go over areas where the surface is bubbled, cracked, or peeling.
- Smooth out edges where faux leather is lifting.
- Wipe again with alcohol to remove residue.
The goal isn’t to remove the faux leather—just soften the harsh edges so the paint lays smooth.
Step 3: Tape Off Anything You Don’t Want Painted
For these chairs, that meant:
- the swivel base
- the underside metal
- any hardware
This is the five minutes that saves you from 45 minutes of regret.
Step 4: Mix Angelus Paint
Angelus recommends 1:1 paint to 2-Hard for vinyl or faux leather.
This ensures:
- adhesion
- flexibility
- no cracking
- a professional finish
Stir until smooth.
Color Note: I used Olive on one chair and Dark Gray on the better of the two. The Olive adds a moody designer feel, while the Dark Gray disguises imperfections like a champ.
Step 5: Apply the First Coat (It Will Look Terrible—Trust the Process)
Your first coat will be thin and patchy. This is correct.
Use:
- a foam brush for large areas
- a small round brush for seams
Apply in thin, even strokes.
Let dry 10–20 minutes before the next coat. A hair dryer on low speeds this up.
Step 6: Build Up Thin Coats (3–5 Total)
This is where the magic happens.
Each coat:
- adds color
- evens texture
- hides wear
- smooths out the faux leather
Because my chairs had peeling and deep wear, I needed 4–5 coats for full coverage. If your piece is in better shape, 3 coats may do the job.
Let each coat dry fully before painting the next.
Step 7: Check for Rough Spots + Touch Up
In the video, she sands lightly between coats only if needed—so I did the same. If a patch looked bumpy or paint settled oddly, I gave it a gentle pass with the sanding block, wiped it clean, and painted again.
Step 8: Seal the Paint With Angelus Acrylic Finisher
Once the final coat is dry, apply Angelus Acrylic Finisher.
Choose:
- Matte for a natural leather look
- Satin for a subtle sheen (this is what I used)
Apply with:
- a soft cloth
- or a sponge applicator
Let cure for 24 hours before using the chair.
This step makes all the difference—your chair will feel soft, flexible, and (truly!) like factory-finished faux leather.
Recommended Products
As an Amazon Associate and member of other affiliate programs, I earn from qualifying purchases.

Keep Designing –
A Designer After

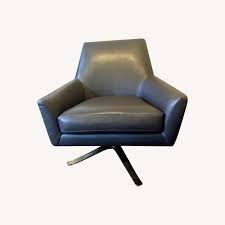
Final Thoughts
There’s a reason I love the look for less mindset: you can absolutely get high-end style without spending designer money. If you know what to look for—and don’t mind a little sanding and painting—you can transform even the most worn-in faux leather chair into a piece that looks custom.
Your dream aesthetic doesn’t have to come with a dream budget.

