Here’s what happened; I wrote this post that was mostly just an infographic. When I saw that people said they were making copies of the image to post at their desks I decided that I wanted to disable the ability for a reader to right click on an infographic. Why? Well, I thought I would use the infographic image as a content upgrade in the form of a PDF. Content Upgrade Image
After researching it and not being able to implement the solutions I found, it came to me how to accomplish what I wanted to do. Here is a QUICK, EASY step-by-step for how to make a content upgrade image.
How to Make a Content Upgrade Image
1. Create a PDF Image
The first thing I did was to create the PDF. Easy enough! Since I use Canva to create just about all of my blog images all I had to do was to save the image (infographic) as a PDF instead of the original jpeg. Content Upgrade Image
2. Upload the PDF
Then I uploaded the PDF in my Media file, just like you would upload an image to insert in a post. Copy the HTML address for this PDF.
 3. Create an Announcement
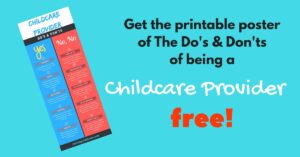
Then I created an image announcement for the content upgrade. Again, I use Canva so it’s pretty easy to do. Here’s what mine looked like. Content Upgrade Image
4. Create an Embed Form
I went to my MailMunch account and created an embeddable form. The steps are pretty failproof, but if you need a guide use this post by And Possibly Dinosaurs (I love her). When it asks where you want readers to be directed after subscribing enter the address where your PDF is (from above #2). In the final step, you will get a code to copy and paste (embed) in your post. Copy that code.
5. Create a Snippet
Now go to the SETTINGS tab on your website. Select Raw HTML Snippets. Paste the MailMunch code to create a snippet. Now copy the snippet. Still with me?
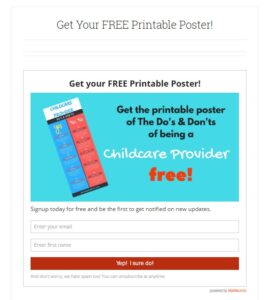 6. Opt-In Page
Create a page on your website for your opt-in. Name it something related to the content upgrade. I titled mine “Get your PRINTABLE poster!” Now paste the snippet you just created for the MailMunch code. Preview the page and you will see your opt-in form for the content upgrade. Publish this page. Copy the address to the page. Almost done!
7. Link Post Image to Page
One more step! Need to Link the post image to the Page. Go back to the post that you created the content upgrade for. Select the image and click the Edit icon. Under IMAGE DETAILS go to DISPLAY SETTINGS. Click the menu under LINK TO and select Custom URL. Paste the address for the PAGE you created in the previous step. Click the UPDATE button in the lower right corner. Now click the UPDATE button to save the changes to your post.
YOU DID IT!
And you are done! Want to see what you did? Ok, click on PREVIEW CHANGES in the dashboard (upper right corner). Now if you click on the image you will now be redirected to the opt-in page. Cool right?
So what do you think? Have you ever made a content upgrade before? Tell me about it. Please leave a comment below.