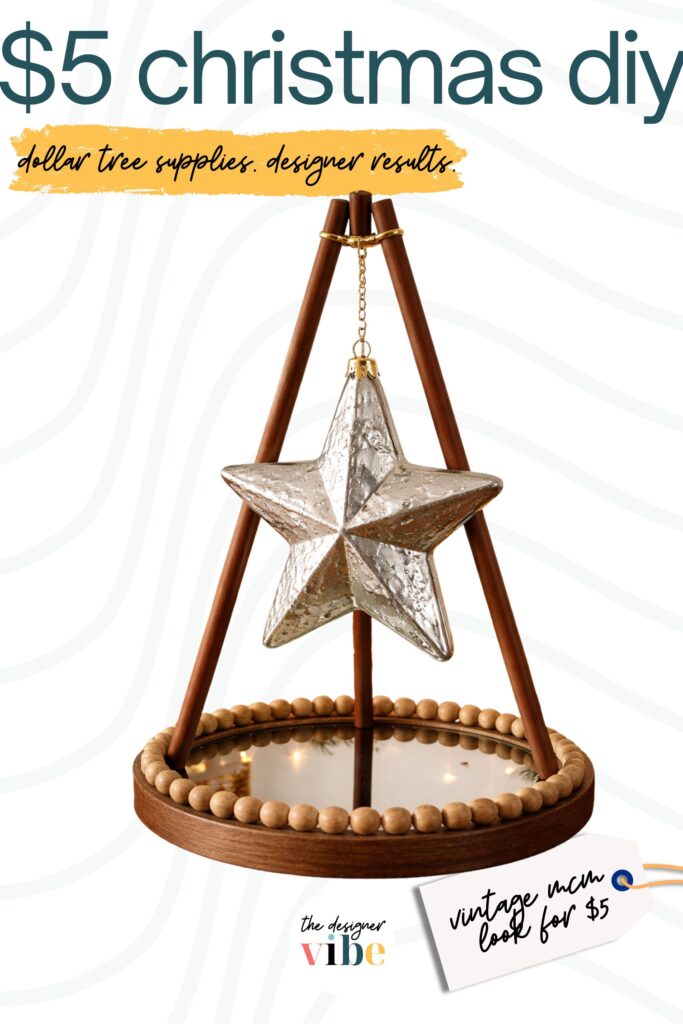
This project shows you how to make an MCM-inspired ornament holder using only Dollar Tree supplies (plus a little creativity). I designed this stand specifically to display my mercury glass ornament, but it would work beautifully for any special ornament you want to highlight.
DIY Dollar Tree Ornament Stand (MCM-Inspired & Budget-Friendly)
Several years ago, I stumbled across what I’m pretty sure is a real vintage mercury glass ornament while thrift shopping. It was oversized, dramatic, and instantly came home with me. To this day, it’s one of my favorite things to pull out at Christmas. I treat it like the fragile treasure it is—wrapped in protective bubble wrap every single year and stored separately from my other holiday decorations because I’m determined to keep it safe.

I also love displaying it during the holidays, but this year I realized it deserved more than just sitting there. I wanted it elevated—literally. I tried a simple plate stand from Dollar Tree, but it was completely underwhelming and didn’t live up to the grandeur of this ornament at all. So, instead of settling, I did what I usually do… I made my own.
That’s how this DIY Dollar Tree Ornament Stand came to be—an easy, affordable project with serious Mid-Century Modern vibes.
Christmas Ornament Stand DIY
My home leans heavily toward Mid-Century Modern style, especially during the holidays. I love warm woods, simple forms, and sculptural details—and since wooden elements are a big part of the MCM look, creating a wooden ornament stand felt like the perfect fit with the rest of my Christmas decor.
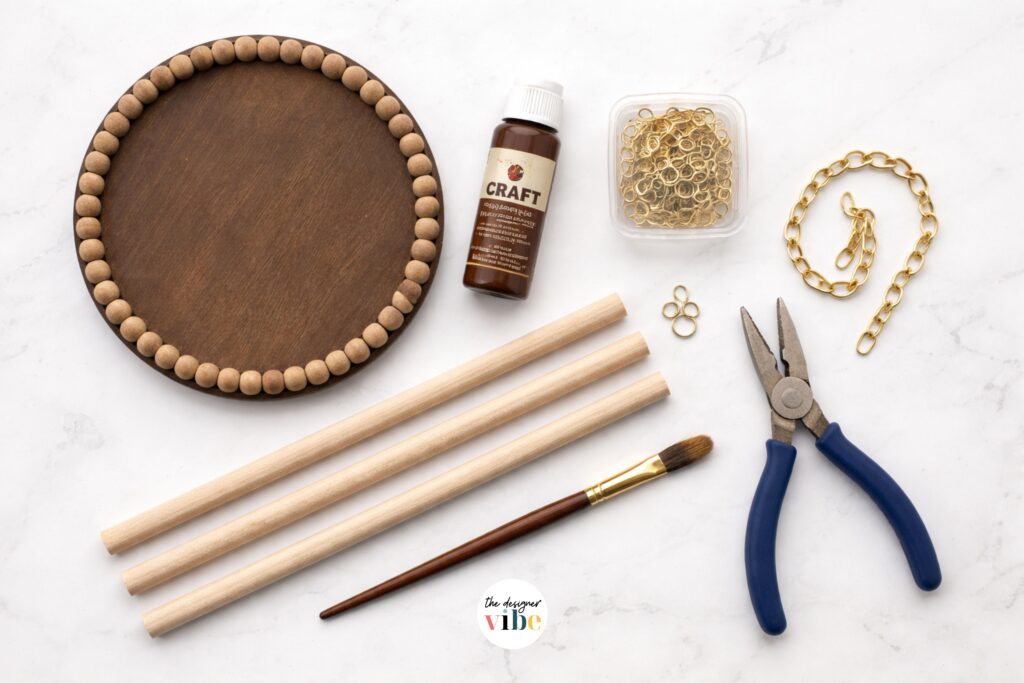
For this DIY, I used Dollar Tree dowels, a picture hanging kit, brown acrylic paint, and a wooden beaded tray as the base. The hanging element came from jewelry components salvaged from a disassembled link bracelet, which adds just the right amount of vintage-meets-modern charm.
The end result? A high-end looking ornament stand that feels intentional, styled, and anything but “dollar store.”
This is how it comes together.
How to Make an MCM Ornament Holder
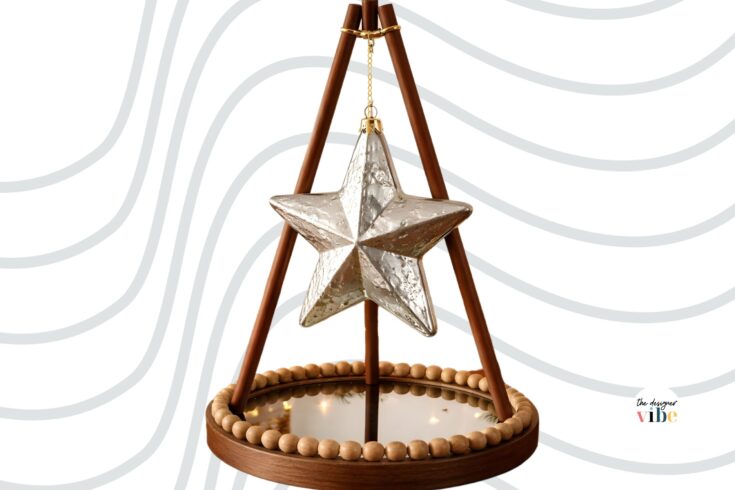
This project shows you how to make an MCM-inspired ornament holder using only Dollar Tree supplies (plus a little creativity). I designed this stand specifically to display my mercury glass ornament, but it would work beautifully for any special ornament you want to highlight.
Materials
- Wooden dowels (Dollar Tree)
- Wooden beaded tray (Dollar Tree)
- Picture hanging kit (ring hooks & jump rings)
- Jewelry chain and clasp (from a disassembled link bracelet)
- Brown acrylic paint
- Round mirror (optional)
Tools
- Needle nose pliers
- Paintbrush
Instructions
- Paint the Dowels
From a pack of four wooden dowels, use three. Paint them with brown acrylic paint to closely match the tone of the wooden beaded tray. Let them dry completely.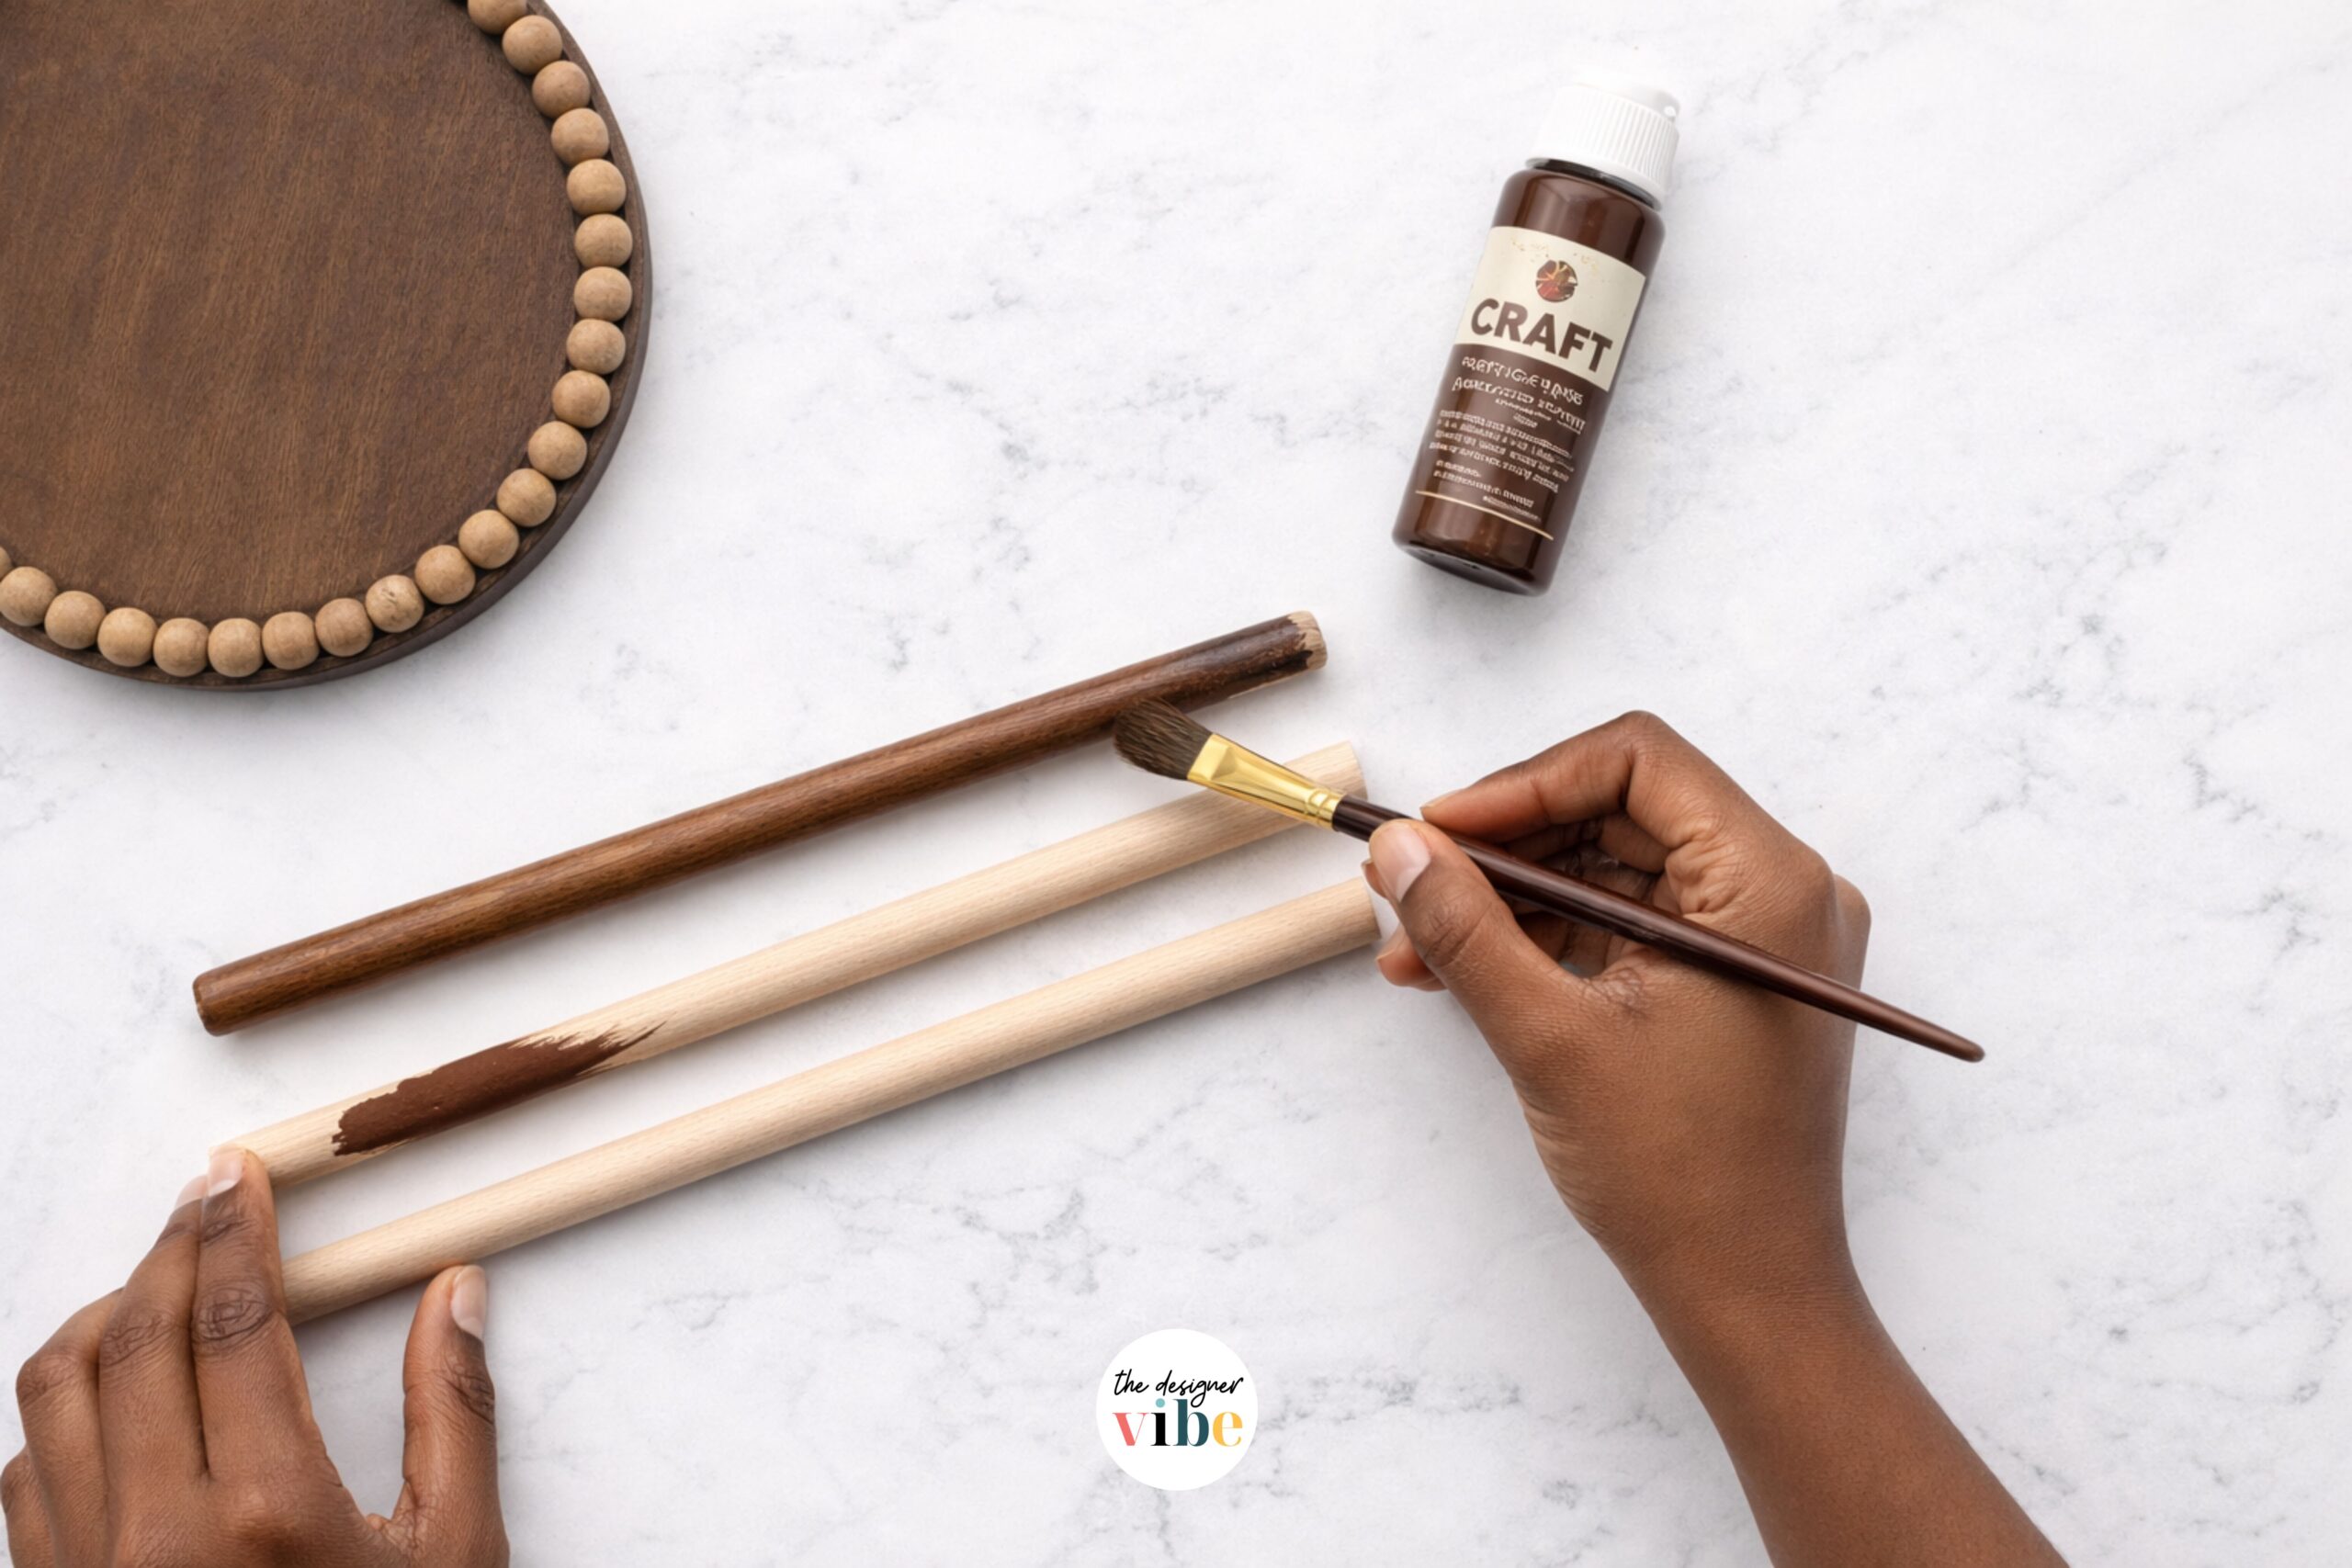
- Add the Ring Hooks
Once dry, screw a small ring hook into one end of each dowel. These will eventually connect together at the top to form the hanging point. - Connect the Dowels
Using needle nose pliers, connect the three ring hooks together with jump rings. This creates the top connection point and allows the dowels to move freely. - Create the Hanging Chain
From the disassembled link bracelet, use a 3-inch length of chain and attach it to the jump ring cluster. Add a clasp at the end so the ornament can be easily attached and removed. - Assemble the Tripod Base
Arrange the dowels into a tripod shape and place them inside the wooden beaded tray. The raised beaded border holds the dowels in place, keeping the stand upright and stable—no glue required. - Hang Your Ornament
Attach your ornament to the clasp, step back, and admire your work.
Optional Step: Add a Mirror Base
If you can find a round mirror in the right size, this is a beautiful optional upgrade for your DIY Dollar Tree Ornament Stand. Simply place the mirror inside the wooden beaded tray before setting the dowel tripod in place. The mirror reflects the ornament from below, adds depth, and subtly enhances the sparkle of mercury glass—especially when Christmas lights are nearby. It’s a small detail, but it really elevates the finished look and makes the display feel even more special.
Notes
All the supplies & tools can be found at the Dollar Tree.
Keep Designing –
Easy Storage Bonus
One thing I love about this project is that no glue is used at all. That means when the holidays are over, the ornament stand can be easily disassembled for storage. The dowels lift right out, the chain and hooks allow everything to store flat—perfect for keeping delicate ornaments safe and minimizing off-season clutter.
Final Vibes
This project is a perfect example of how you can get the exact look you want using Dollar Tree items—even when you’re aiming for something that feels high-end and designer-inspired. Especially at Christmas, when decorations can get expensive fast, DIY projects like this prove that budget-friendly doesn’t have to mean boring.
With a little creativity (and a few dollar store finds), you can create custom holiday decor that feels personal, intentional, and right at home with your style—even if that style leans Mid-Century Modern like mine does.
If you ask me, that’s a win worth displaying front and center. 🎄